Kubernetes deployments
This topic shows you how to deploy a publicly-available NGINX Docker image and manifest into your Kubernetes cluster using a rolling update strategy in Harness.
In this topic, you'll learn how to:
- Set up a Kubernetes pipeline.
- Run the new Kubernetes pipeline and deploy a Docker image to your target cluster.
The following video explains Kubernetes deployments using Harness:
Set up a Kubernetes cluster for deployment
You'll need a target Kubernetes cluster for the Harness Delegate and deployment. Ensure your cluster meets the following minimum requirements:
- Number of nodes: 2.
- vCPUs, Memory, Disk Size: 4vCPUs, 16GB memory, 100GB disk. In GKE, the e2-standard-4 machine type is enough for this quickstart.
- Networking: outbound HTTPS for the Harness connection to app.harness.io, github.com, and hub.docker.com. Allow TCP port 22 for SSH.
- A Kubernetes service account with permission to create entities in the target namespace is required. The set of permissions should include
list,get,create, anddeletepermissions. In general, the cluster-admin permission or namespace admin permission is enough.
For more information, go to User-Facing Roles from Kubernetes.
Create the deploy stage for the Kubernetes pipeline
Pipelines are collections of stages. For this topic, we'll create a new pipeline and add a single stage.
Create a project for your new CD pipeline: if you don't already have a Harness project, create a project for your new CD pipeline. Ensure that you add the Continuous Delivery module to the project. Go to create organizations and projects for more information.
-
In your Harness project, select Deployments, and then select Create a Pipeline.

-
Enter the name CD Quickstart and select Start.
Your pipeline appears.
-
Select Add Stage and select Deploy.
-
Enter the name Deploy Service, make sure Service is selected, and then select Set Up Stage.
The new stage settings appear.
-
In the Service tab, select New Service.
noteLet's take a moment and review Harness services and service definitions (which are explained below). Harness services represent your microservices/apps logically. You can add the same service to as many stages as you need. Service definitions represent your artifacts, manifests, and variables physically. They are the actual files and variable values.
By separating services and service definitions, you can propagate the same Service across stages while changing the artifacts, manifests, and variables with each stage.
-
Give the service the name nginx and select Save.
Once you have created a service, it is persistent and can be used throughout the stages of this or any other pipeline in the project.
Add the Kubertnetes manifest for deployment
Next, we can add a Kubernetes manifest for NGINX. We'll use the publicly-available manifest available from Kubernetes.
-
In Service Definition, in Deployment Type, select Kubernetes.
-
In Manifests, select Add Manifest.
noteWhat about Artifacts? In this quickstart we are using a publicly-available NGINX Docker image from DockerHub, and the location of the image is hardcoded in the public manifest from Kubernetes. The Artifacts section is only used when the public artifact is not hardcoded in the manifest or the repo is private. In those cases, you add the image in Artifacts with a Connector for the repo and then reference the image in your values.yaml (
image: <+artifact.image>). For more information, go to Add Container Images as Artifacts for Kubernetes Deployments. -
Select K8s Manifest, and select Continue.
-
In Select K8sManifest Store, select GitHub, and then select New GitHub Connector.
-
The Git Connector settings appear. Enter the following settings.
-
Name: enter a name for the connector.
-
URL Type: select Repository.
-
Connection Type: select HTTP.
-
Git Repository URL: enter
https://github.com/kubernetes/website. -
Username and Token: Enter the username and a Github Personal Access Token (PAT) for your GitHub account. You'll have to create a Harness secret for the password.
- In Personal Access Token, click Create or Select a Secret.
- Select New Secret Text.
- In Secret Name, enter a name for the secret like github-pat.
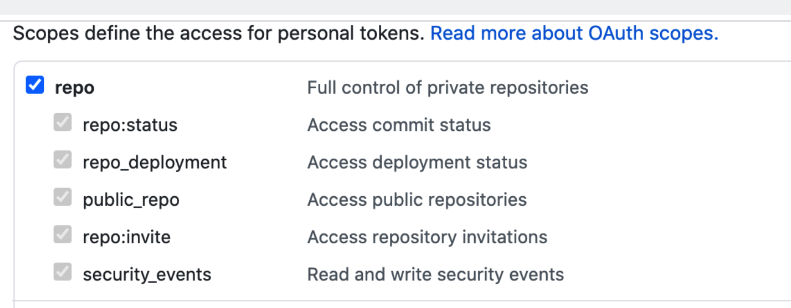
- In Secret Value, paste in a GitHub Personal access token. When you're logged into GitHub, these are typically listed at https://github.com/settings/tokens. For steps on setting up a GitHub PAT, go to creating a personal access token from GitHub. Ensure you PAT has the repo scope selected:
-
-
Select Continue.
-
In Connect to the provider, select Connect through a Harness Delegate, and then select Continue. We don't use the Connect through Harness Platform option here simply because you'll need a Delegate later for the connection to your target Kubernetes cluster. Typically, the Connect through Harness Platform option is a very quick way to make connections without having to use Delegates.
Expand the section below to learn more about installing delegates.
Use the delegate installation wizard
Install a delegate using the terminal
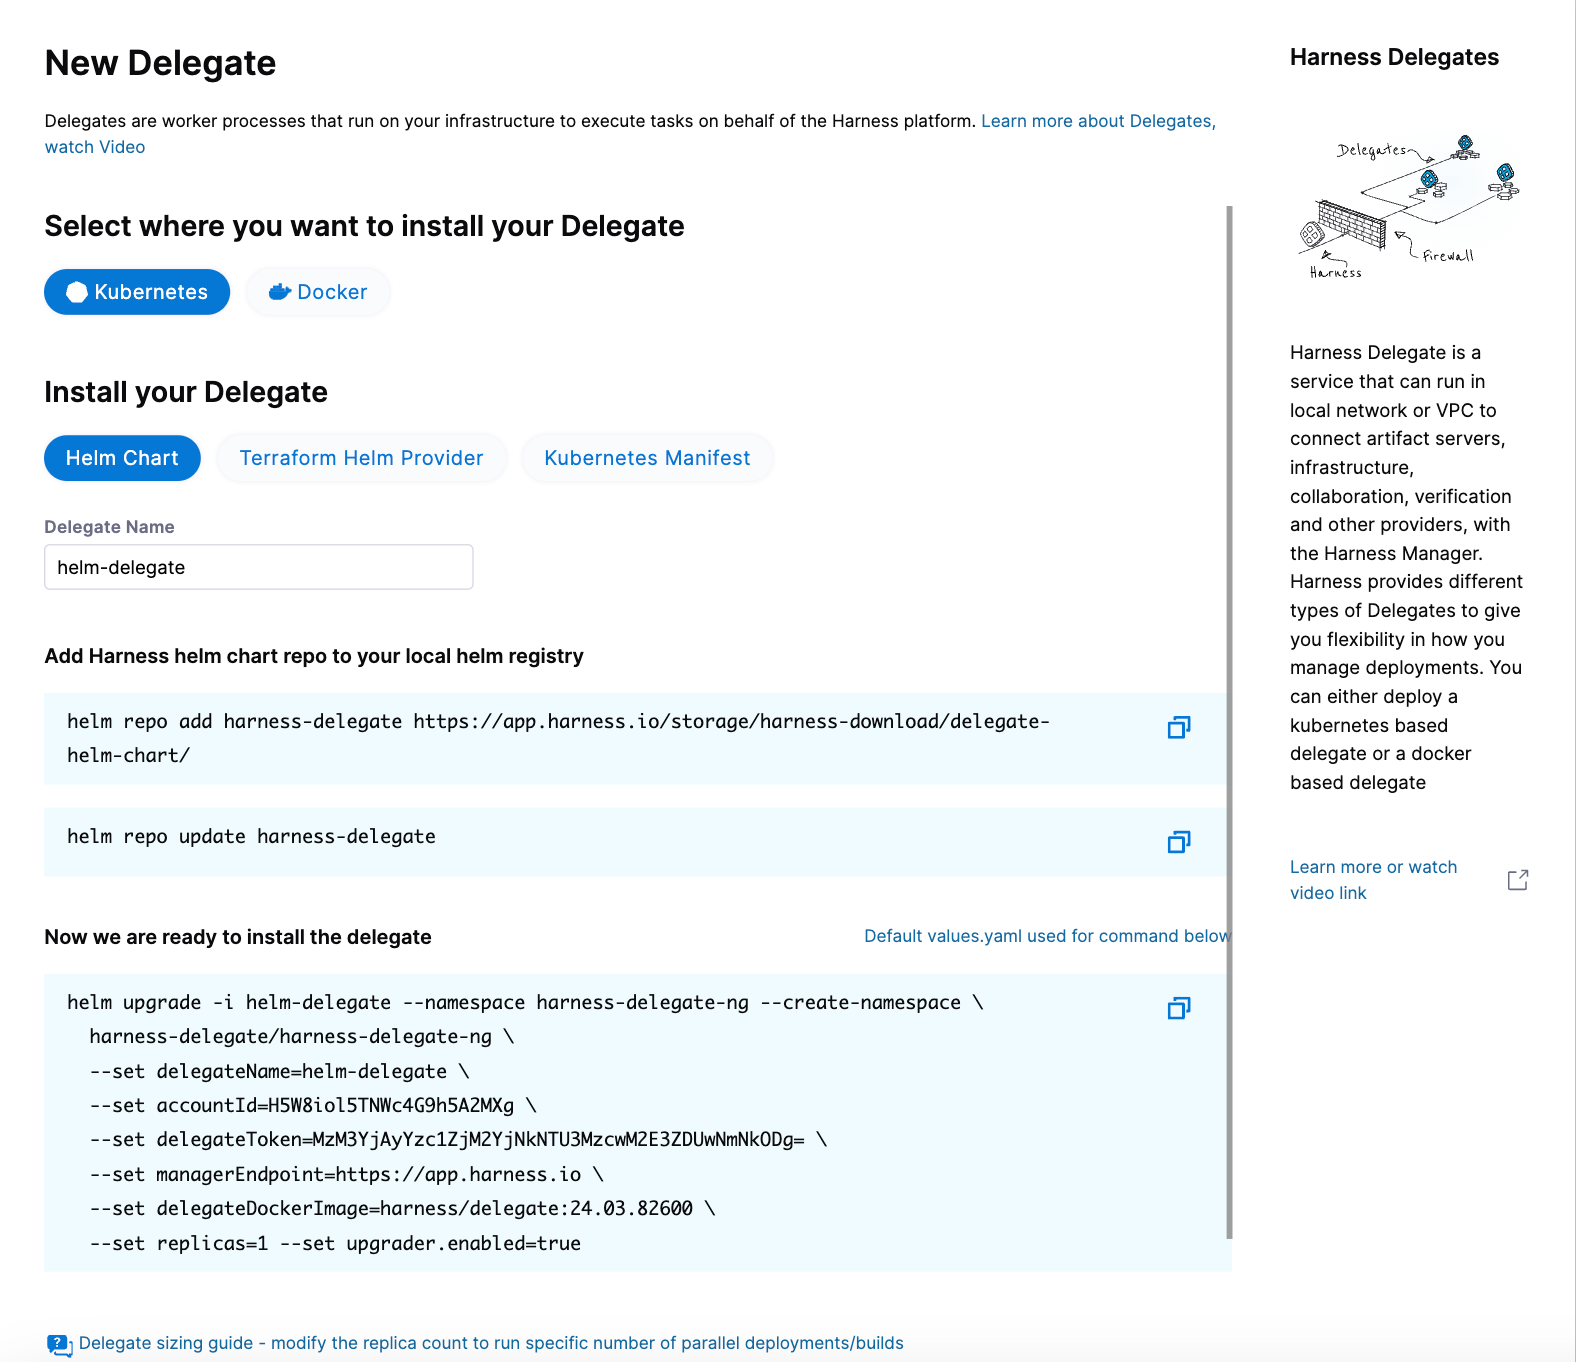

To learn more, watch the Delegate overview video.
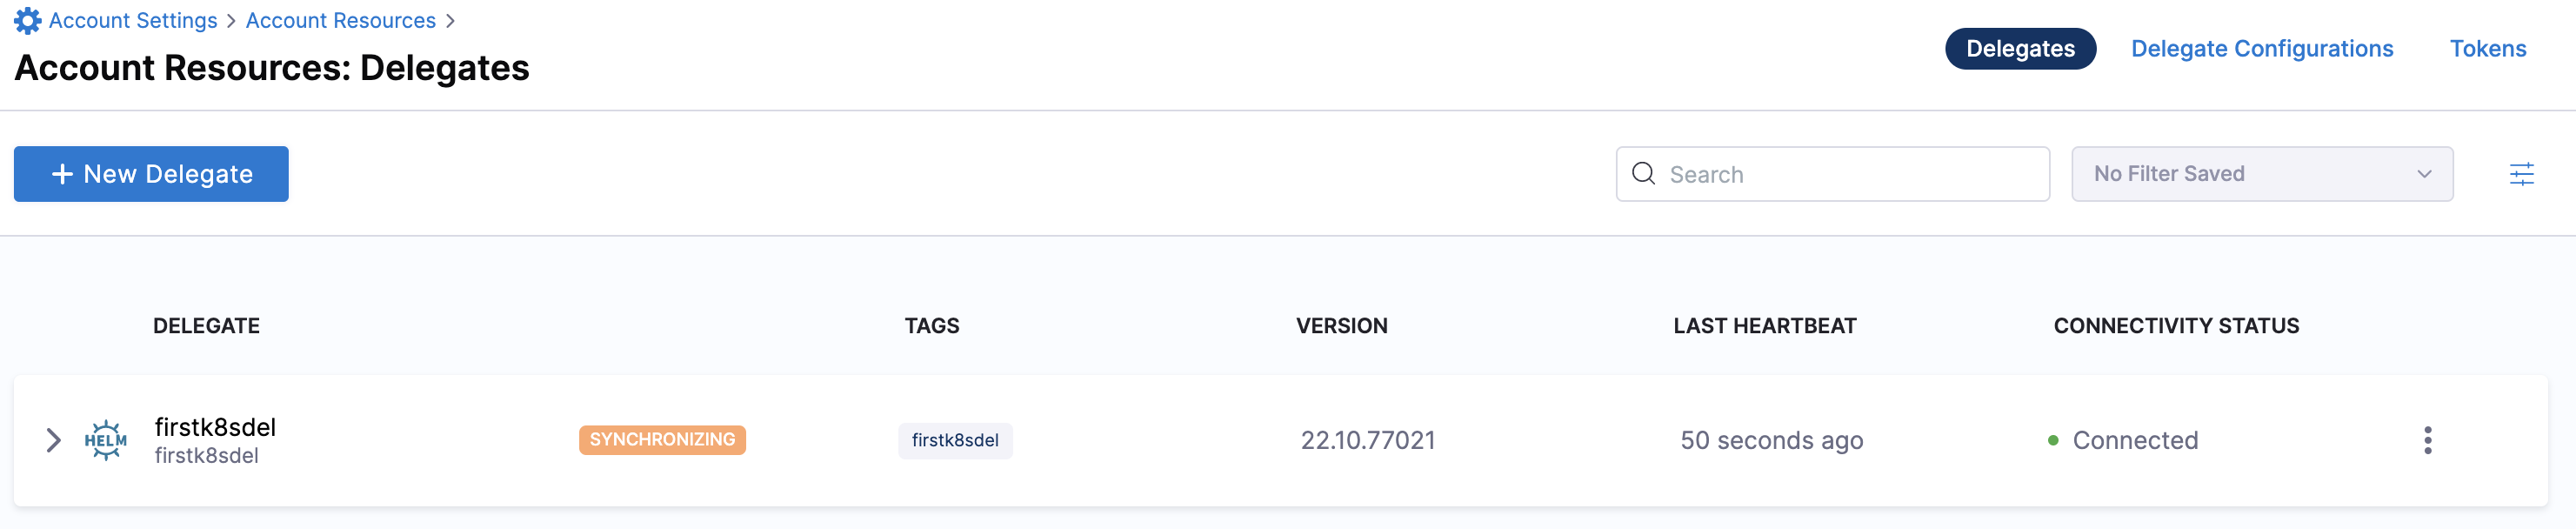
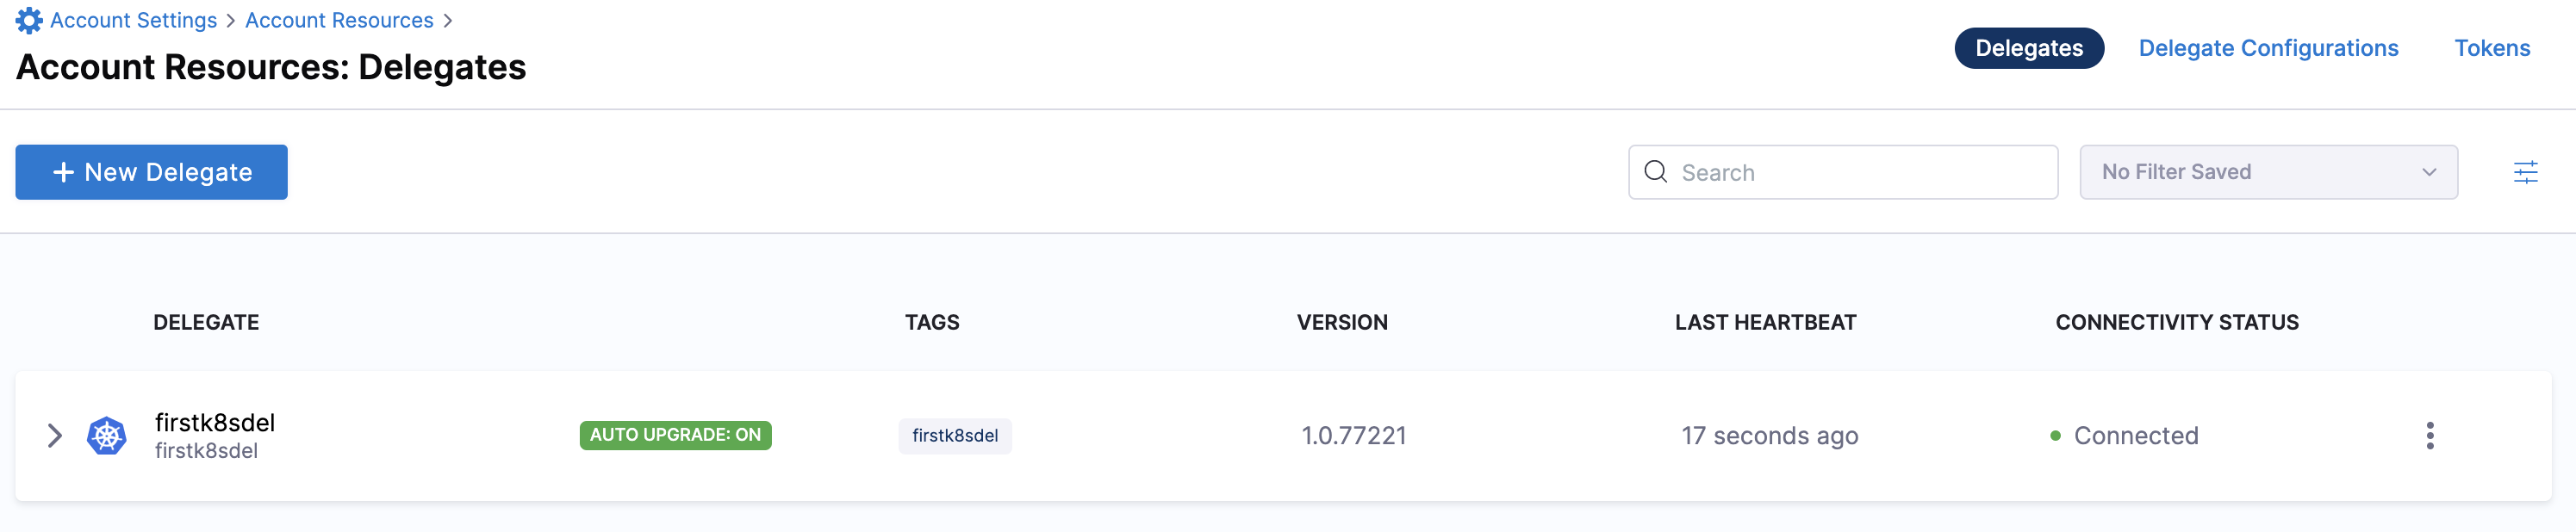
- Back in Set Up Delegates, you can select the new Delegate. In the list of Delegates, you can see your new Delegate and its tags.
- Select the Connect using Delegates with the following Tags option.
- Enter the tag of the new Delegate and select Save and Continue. When you are done, the Connector is tested.
- Select Continue.
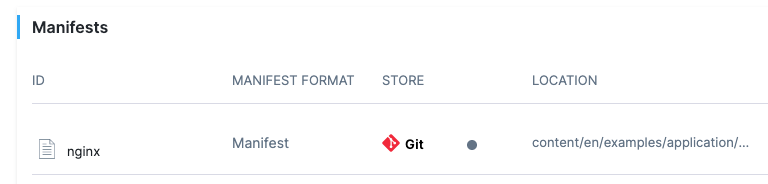
- In Manifest Details, enter the following settings, test the connection, and click Submit. We are going to provide connection and path information for a manifest located at
https://raw.githubusercontent.com/kubernetes/website/main/content/en/examples/application/nginx-app.yaml.- Manifest Identifier: enter nginx.
- Git Fetch Type**:** select **Latest from Branch**.
- Branch: enter main.
- File/Folder path:
content/en/examples/application/nginx-app.yaml. This is the path from the repo root.
The manifest is now listed.
- Select Next at the bottom of the Service tab.
Now that the artifact and manifest are defined, you can define the target cluster for your deployment.
Define the target cluster for the Kubernetes deployment
The target cluster is your own Kubernetes cluster, hosted in your cloud environment. This is where we will deploy the Docker image using the manifest you selected.
Harness connects to all of the common cloud platforms and provides a platform-agnostic Kubernetes cluster connection that can connect to Kubernetes anywhere.
-
In Infrastructure Details, in Specify your environment, select New Environment. Just like with a service, you can create a new environment or selecting an existing one. We'll create a new one.
-
In New Environment, enter a name, select Pre-Production, and select Save. The new environment appears.
-
In Infrastructure Definition, select Kubernetes.
noteLet's take a moment and review Harness environments and infrastructure definitions. Harness environments represent your deployment targets logically (QA, Prod, etc). You can add the same Environment to as many stages as you need. Infrastructure definitions represent your target infrastructure physically. They are the actual clusters, hosts, etc.
By separating environments and infrastructure definitions, you can use the same environment in multiple stages while changing the target infrastructure settings with each stage.
-
An Infrastructure Definition is where you specify the target for your deployment. In this case, your Kubernetes cluster and namespace.
-
In Cluster Details, in Connector, select Select a connector.
-
Select New Connector.
-
The Kubernetes cluster connector appears.
The Kubernetes cluster connector is covered in detail here, but let's quickly walk through it.
Let's look at the steps:
-
In Kubernetes Cluster Connector, in Name, enter Kubernetes Quickstart, and select Continue.
-
In Details, select Use the credentials of a specific Harness Delegate. We will select the Delegate next.

-
Select Continue.
-
Select the Kubernetes Delegate you added earlier using its Tags, and then select Save and Continue. Harness verifies the Connector.
-
Select Finish.
-
Select the new Connector and then select Apply Selected.
-
Back in Cluster Details, in Namespace, enter the target namespace for the deployment. For example, default. You can use any namespace in your target cluster.
-
In Advanced, in Release name, enter
quickstart. For a release name, you can use a built-in or custom expression or any text you like. Harness requires a release name for tracking. It is applied to the pods as a label. The release name must be unique across the cluster. -
When you are done, the Cluster Details will look something like this:

The target infrastructure is complete. Now we can add our stage steps.
-
Select Next to move onto Execution.
Add a Kubernetes rollout deployment step to the stage
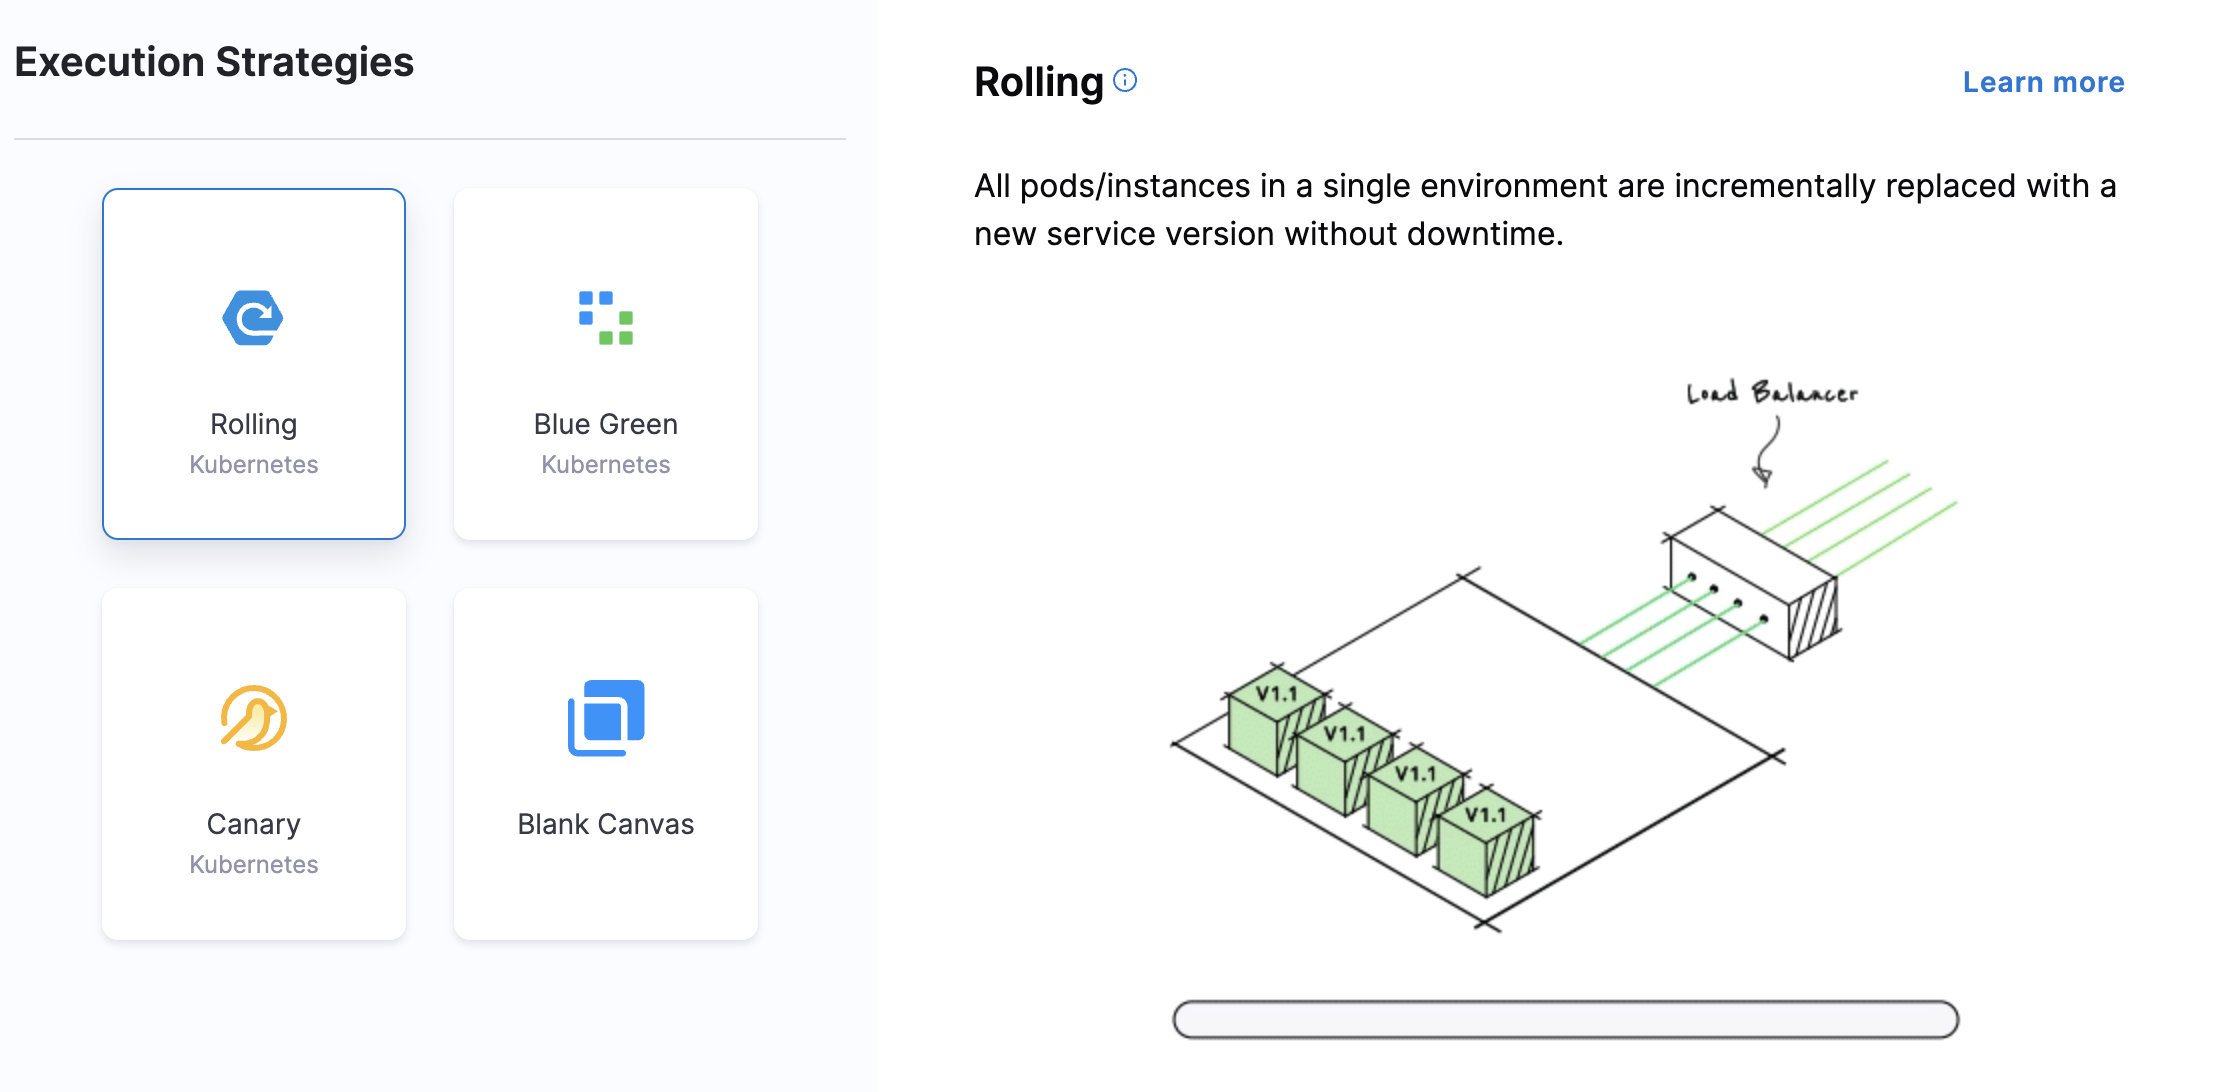
Now you can select the deployment strategy for this stage of the pipeline.
-
In Execution Strategies, select Rolling, and then select Use Strategy.
-
The Rollout Deployment step is added.
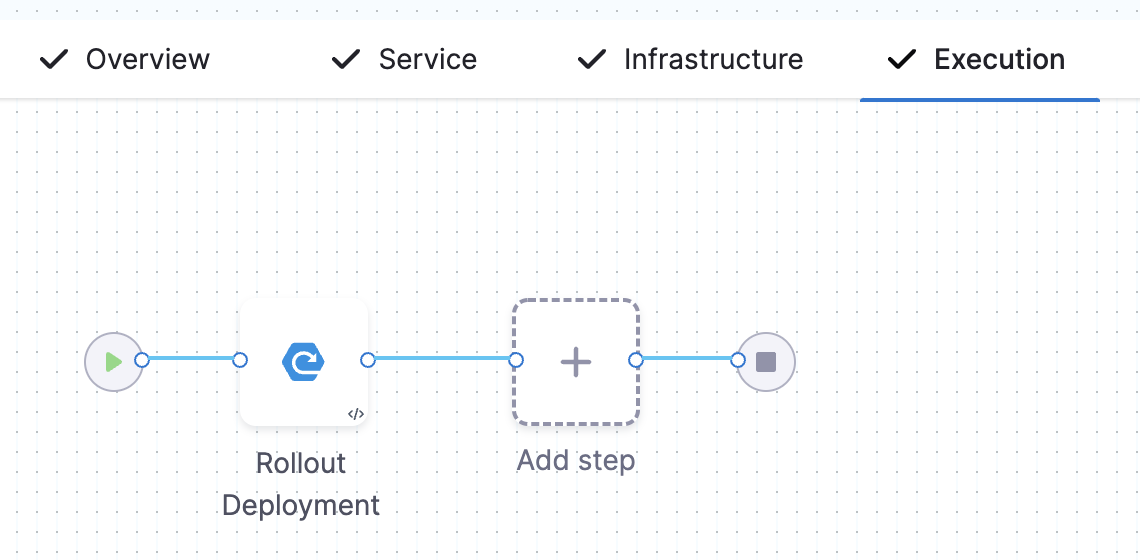
This is a standard Kubernetes rolling update. By default, Harness uses a
25% max unavailable, 25% max surgestrategy.
That's it. Now the pipeline stage is complete and you can deploy.
Deploy the Kubernetes pipeline and review
-
Select Save > Save Pipeline and then Run. Now you can select the specific artifact to deploy.
-
In Primary Artifact, select stable. This is the same as using
docker pull nginx:stable. -
Select Run Pipeline. Harness will verify the Pipeline and then run it. You can see the status of the deployment, and pause or abort it.

-
Toggle Console View to watch the deployment with more detailed logging. Select the Rollout Deployment step and expand Wait for Steady State.
You can see
deployment "my-nginx" successfully rolled out.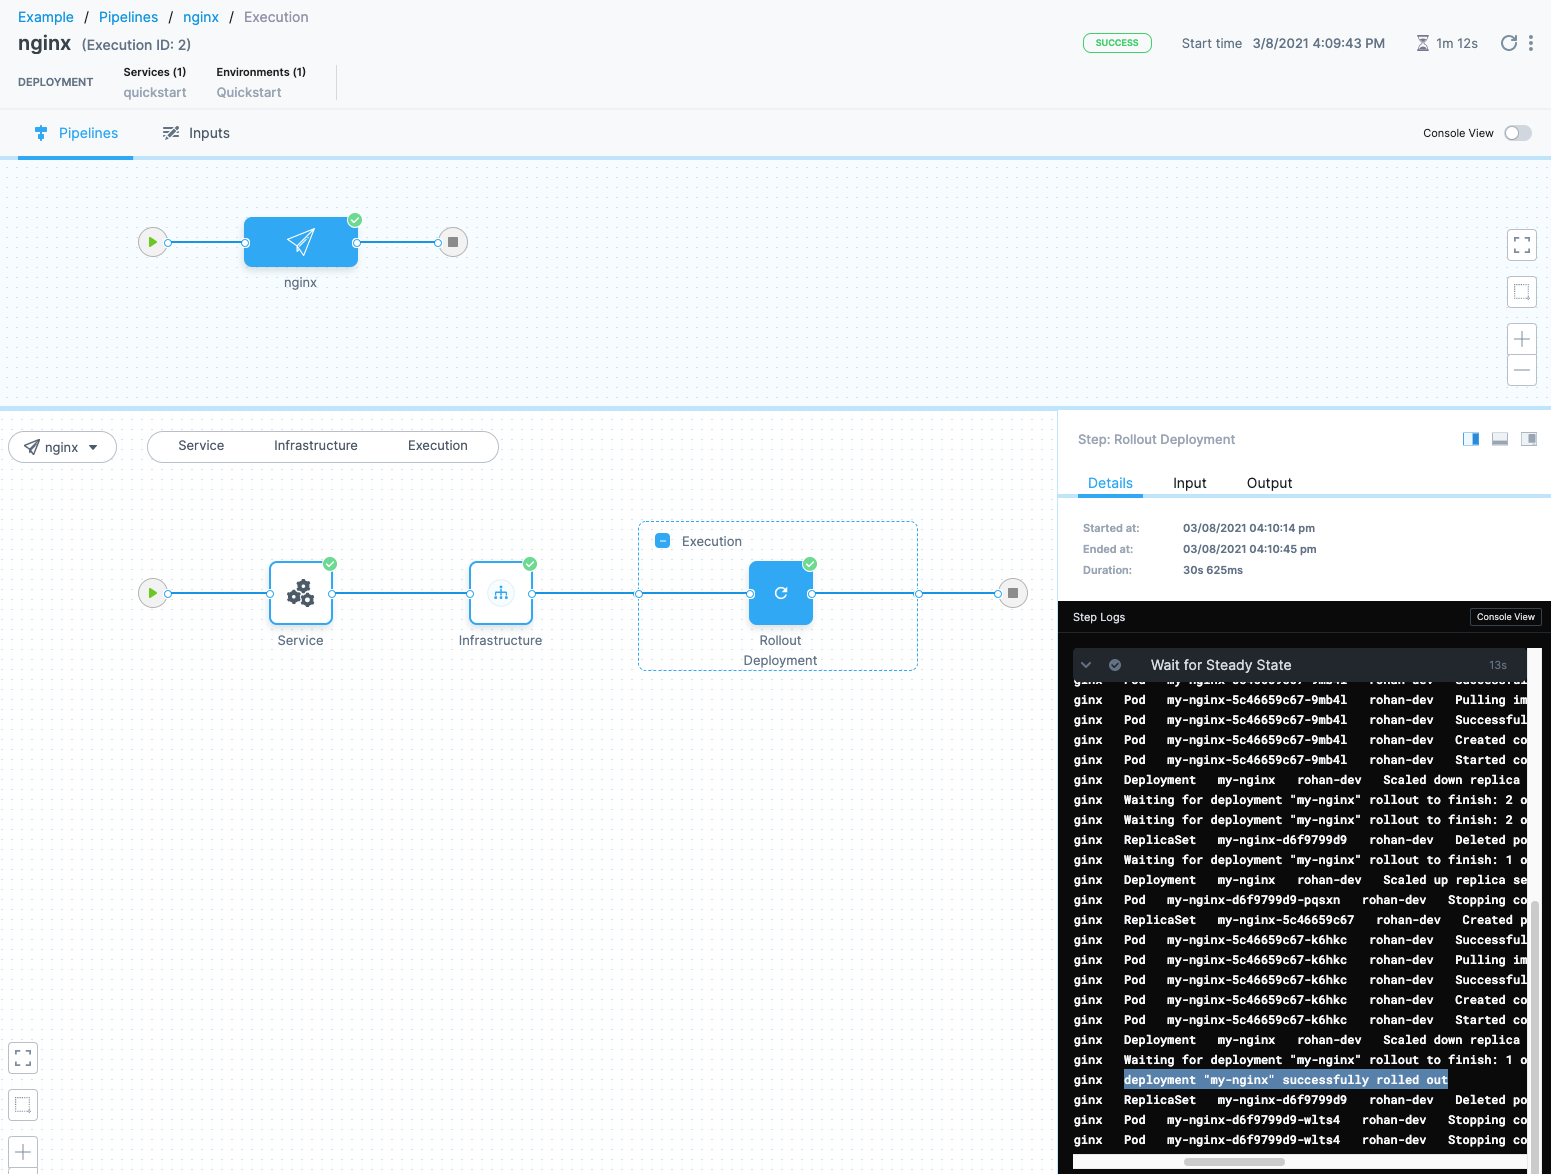
Congratulations! The deployment was successful.
In your project's Deployments, you can see the deployment listed:

If you run into any errors, it is typically because the cluster does meet the requirements from Before You Begin section or the cluster's network setting does not allow the Delegate to connect to Docker Hub.In this tutorial, you learned how to:
- Install and launch a Harness Kubernetes Delegate in your target cluster.
- Connect Harness to your Kubernetes cluster and an artifact server.
- Add your manifests to Harness.
- Create an infrastructure definition that targets your cluster and namespace.
- Add a Kubernetes rolling update.
- Deploy your Kubernetes pipeline to your target cluster.
Next, try using Harness Continuous Integration to build a codebase, upload it to a repo, and run unit and integrations tests.
Clean up the deployment
For steps on deleting the Delgate, go to delete a delegate.
Next steps
See CD tutorials for other deployment features.